Teaching Piano Students to Pedal, Part 5: Chopin

For many of our students, the works of Chopin present the first occasions where carefully planned and executed pedalling is required. The Inventions and Sonatinas they’ve studied before earning their first Chopin Waltz make few if any demands for the pedal. A brand-new sound world is offered to them once they start learning their first Chopin piece, and we as teachers have to introduce them to concepts and skills that will help them succeed.
That Chopin wanted us to make extensive use of the pedal is clear. Of all Romantic composers he left us with the largest number of markings. Schumann would write “with pedal” at the beginning of pieces and leave us to our own devices to figure out when to use it. Schubert only indicated pedal a handful of times in his entire output of piano music. The same goes for Brahms. But Chopin left thousands of markings, sometimes scratched out after further reflection and replaced with newer ideas. Clearly the indications meant something to him.
Chopin inherited two methods for indicating when he wanted the pedal used, both of which have been discussed in earlier articles in this series.
In this famous passage from the Nocturne in E-flat Major we see Chopin using the portato notation that was discussed at length in the third article. The chromatic chords in the second half of the first measure all have dots as well as a slur, indicating that we are to connect the chords with our foot while separating them with our hands.

In the same article we also saw this passage from the first Nocturne:

Here Chopin also used the portato touch and indicated that we are to continue to change the pedal twice each bar. That rhythm of pedal changing was established on the first line and continued by the simile indication in the second complete measure.
This Ped. indication followed by the asterisk is the only other pedal indication Chopin inherited besides the portato one. These were the only two indications he had at his disposal, even though the variety of pedalled effects he created were so much more varied than those of earlier composers. If he had tried to fit in a Ped. and an asterisk for every chord in the first example there simply would not have been room, so he let the portato notation convey the message.
With these limited tools Chopin was able to share much essential information. We learn additional information from his students who described how the master’s right foot was often trembling, implying vibrato pedalling, and that he often held down notes that were not written to be held.
In the following example from the second Scherzo we see that Chopin wants us to maintain the pedal through the rests and staccatos in m. 5. In fact, he wants us to maintain it through the chords that follow as well. Pedalling through rests is something we train our students not to do when playing Classical literature, but then once they start playing Chopin we need to introduce this aspect of the new musical style.

There is rarely confusion about pedalling through the rests in the above example, but there is often guilt or confusion about the following rests:
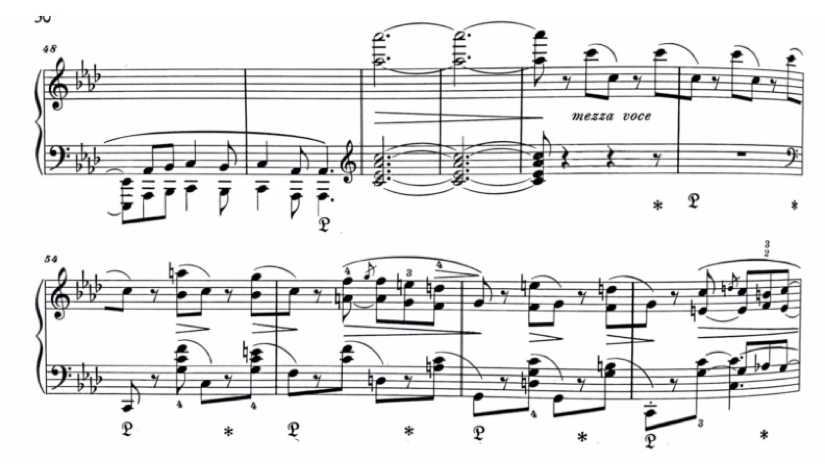
Here we learn two things: first is that, as in the Scherzo, Chopin liked to have the entire piano resonating by adding chords on top of sustained bass notes, as we see in the middle of the first line. The Ped. mark is placed under the A-flat octave, which will continue sounding when the chord above is played. On the second line we again see Chopin indicating that the pedal should be retained through the rests for the entire line. Rests, therefore, are indications for our hands and not always for our feet.
We also discover the limitation of the pedal notation Chopin inherited. When exactly do we release the pedal? Does Chopin really want us to pedal through the first rests in each measure but not the second? If what he wanted was a legato pedal from bass note to bass note how would he indicate that? The dilemma is that he couldn’t. The asterisk always comes before the next Ped., making it seem that Chopin always wanted separate pedals. This is where we get into all sorts of tangles interpreting Chopin’s pedal markings. A thorough discussion of this is beyond the scope of this article. My goal here is to address how we first introduce our students to pedalling Chopin’s music. Our students shouldn’t be expected to consider all the various theories and possibilities for interpretation, but we should have our own sense of these matters so we can present a thoughtful and unified approach to our students. We know from the writings of Chopin’s students that he employed legato, or syncopated pedalling. It was considered one of the achievements of the Romantic Era, allowing for lyrical playing as well as for chords that don’t have silences between them.
In the first article in this series we addressed the beginning stages of training students to execute legato pedalling. Students who need extra practice mastering this technique as well as those who would like an opportunity to display their pedalling skills can be assigned this famous Prelude:

Creating a legato melody and chords that blend seamlessly without silences or blurs depends on correct execution of syncopated pedalling, where the foot changes just after the chords have been played and not before.
For a concise discussion of Chopin’s pedal indications as well as his other expressive marks I highly recommend Seymour Bernstein’s Chopin: Interpreting His Notational Symbols. Mr. Bernstein argues that Chopin was meticulous about the placement of the Ped. marks but resigned to the fact that the asterisks could never be placed in a precise enough manner to distinguish between separate and legato pedals. He advocates for a 3-stage approach to making decisions about pedalling:
Stage No. 1
Pedal legato from one pedal sign to the next, even though you may think at first that the notation is exaggerated, or that Chopin or his editors have made a mistake. (No edition is perfect. For example, one occasionally finds pedal signs missing or misaligned with the tones to which they apply.)
Stage No. 2
Should the accumulation of dissonances offend your musical ear, do not blame Chopin or the modern-day piano. Rather, assume that the fault is yours. You may not be playing with the proper dynamics, or voicing properly. Always be certain that bass tones are sufficiently loud.
Stage No. 3
If, after trying the above instructions, your musical ear cannot accept the long pedal, then try one of the following:
- Half-pedalling or flutter pedalling (It was often observed that [Chopin’s] foot seemed literally to vibrate as he rapidly pedalled certain passages.”) quoted from Arthur Hedley, Chopin, 3rd edition, rev. Maurice Brown (London: Dent, 1974) 123
- Make extra pedal changes
- Use non-legato
Putting these suggestions into practice would lead us in the examples from the two Nocturnes above to adopt a legato approach to pedalling, connecting the pedal from bass note to bass note, or from Ped. to Ped., and not separating before each bass. Spaces between bass notes would create hiccups that seems to me contradictory to the lyrical nature of these pieces. Students will need to practice their legato pedalling to keep this smooth, and they will need to be taught to listen for more sound than they may have produced in the past on just the bass note and not the rest of the left-hand figures.
The next step in achieving an effective balance of all the components is to have the students listen for the interplay between the melody and the bass line. I often have students play the melody along with just the bass note and the pedal to ensure there is enough sound on the bass and clear, smooth pedal changes. This helps connect their ears to the duet between the outer voices and to the clarity of their pedalling.
In the 3rd Ballade example above there is a huge distance between the pedal mark under the octave A-flat on the first line and the next Ped. marking. All the notes in between are part of the A-flat Major harmony being sustained in the pedal, so no dissonance is created by maintaining the same pedal. I instruct my students to observe the markings Chopin has given us: the swaying octave-C motive is introduced during the sustained A-flat harmony, then is heard on its own in the last measure of the first line. A pedal change at the beginning of the second line announces the beginning of the new theme.
Notice this beautiful moment a few measures later as this section of the piece builds to a climax:
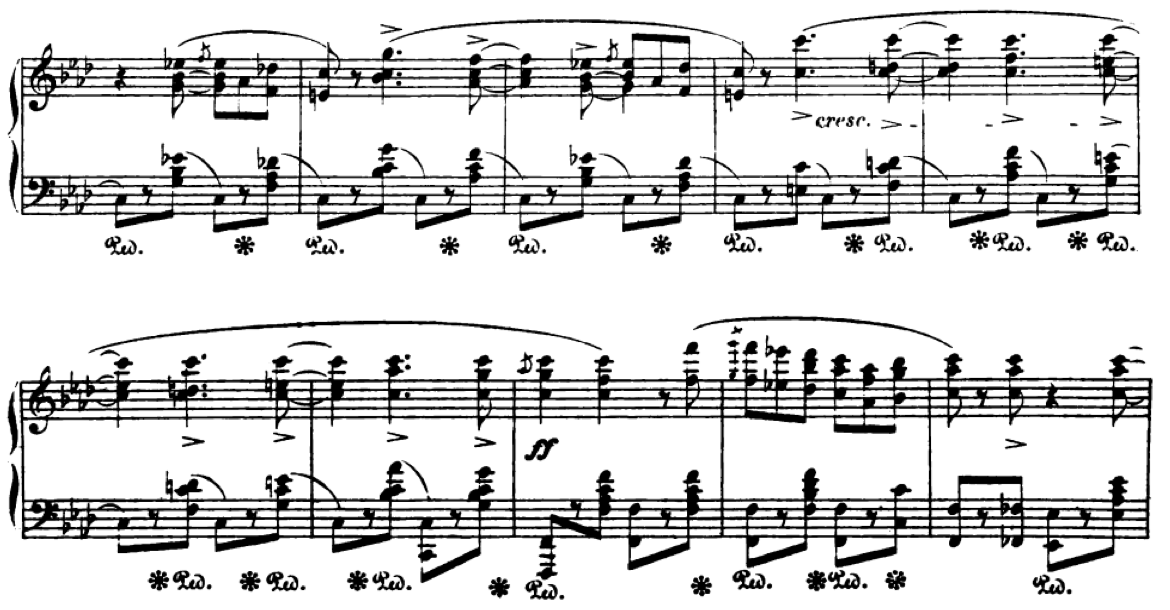
The pedals were consistently marked on the downbeats of the first measures, but near the end of the first line in the above example Chopin moves the markings to the upbeats. This allows us to connect the melody notes which would otherwise have been separated had we continued to pedal on the downbeats. Chopin shifts the pedal back to downbeats as we arrive full force on the ff in the 3rd measure of the 2nd line. He subtly uses the pedal to shift the melodic accents and then to create a definitive sense of arrival at the climax.
Once we start searching for these ways Chopin masterfully manages the pedal to create new effects we realize how thoughtful he was about its use. The notation available to him wasn’t as clear as it could have been, and editors through time have innocently changed the original markings because of their own confusion about what might be indicated. We can disagree about how exactly to interpret Chopin’s markings, but what we shouldn’t allow ourselves to do is to ignore them or carelessly change them. Consulting Urtext editions that preserve Chopin’s original pedal markings is, of course, essential. We should most definitely train our students to come to an understanding about what the markings are telling us, and we must train their ears to hear if they’re executing their legato pedals cleanly and if they’re achieving the required balance to ensure all voices are heard.


